


The basics of the design were straightforward, but tedious to code. Much work had to be done building symbol tables from executables, figuring out how line numbers mapped to memory addresses, and so on, but the most important discoveries lay in that a parallel program debugger had to work in a rather different way than normal sequential versions.
Lesson 1. Avoiding Deadlock The first important discovery was that a parallel program debugger couldn't operate in the ``on'' or ``off'' modes of conventional debuggers. In sdb or dbx, for example, either the debugger is in control or the user program is running. There are no other states. Once you have issued a ``continue'' command, the user program continues to run until it either terminates or reaches another breakpoint, at which time you may once again issue debugger commands.
To see how this fails for a parallel program, consider the code outline shown in Figure 5.7. Assume that we have two nodes, both stopped at breakpoints at line one. At this point, we can do all of the normal debugger activities including examination of variables, listing of the program, and so on. Now assume that we single-step only node 0. Since line one is a simple assignment we have no problem and we move to line two.
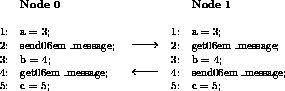
Figure 5.7: Single-Stepping Through Message-Passing Code
Repeating this process is a problem, however, since we now try to send a message to node 1 which is not ready to receive it-node 1 is still sitting in its breakpoint at line one in its node. If we adopted the sequential debugger standard in which the user program takes control whenever a command is given to step or continue the program, we would now have a deadlock, because node 0 will never return from its single-step command until node 1 does something. On the other hand node 1 cannot do anything until it is given a debugger command.
In principle, we can get around this problem by redefining the action of the send_message function used in node 0. In the normal definition of our system at that time, this call should block until the receiving node is ready. By relaxing this constraint, we can allow the send_message function to return as soon as the data to be transmitted is safely reusable, without waiting for the receive.
This does not save the debugger. We now expect the single step from line two to line three to return, as will the trivial step to line four. But the single step to line five involves receiving a message from node 1 and no possible relaxing of the communication specification can deal with the fact that node 1 hasn't sent anything.
Deadlock is unavoidable.
The solution to this problem is to simply make debugging a completely autonomous process which operates independently of the user program. Essentially, this means that any debugger command immediately returns and gives the user a new prompt. The single-step command, for example, doesn't wait for anything important to happen but allows the user to carry on giving debugger commands even though the user process may be ``hung'' as a consequence of the single step as shown in Figure 5.7.
Lesson 1a. Who Gets the Input? As an immediate consequence of the decision to leave the debugger in control of the keyboard at all times, we run into the problem of how to pass input to the program being debugged.
Again, sequential debuggers don't have this problem because the moment you continue or run the program it takes control of the keyboard and you enter data in the normal manner. In ndb, life is not so simple because if you start up your code and it prints on the screen
Enter two integers: [I,J] or some such, you can't actually type the values because they would be interpreted as debugger commands! One way around this is to have multiple windows on your workstation; in one you type debugger commands; in the other, input to your program. Another solution is to have a debugger command that explicitly switches control to the user program in just the same way that a sequential debugger would: ndb supports both mechanisms.
Lesson 2. Show State Because the debugger operates in the manner just described, it becomes very important to give the user a quick way of seeing when something has really happened. Normal sequential debuggers give you this feedback by simply returning a prompt whenever the user program has encountered a breakpoint or terminated. In our case, we provide a simple command, ``show state,'' to allow the user to monitor the progress of the node program.
As an example, the output when executed on node 0 at line two might be something like
Node 0: Breakpoint, PC=[foo.c,2] which shows that the node is stopped at a breakpoint at the indicated line of a source file named ``foo.c''. If we step again, the debugger gives us back a prompt and a very quick ``show state'' command might now show
Node 0: Running, PC=[send.c, 244] showing that the node is now running code somewhere inside a source file called ``send.c''. Another similar command would probably show something like
Node 0: Breakpoint, PC=[foo.c, 3] indicating that the node had now reached the breakpoint on the next line. If the delay between the first two ``show state'' commands were too long, you might never see the ``Running'' state at all because the node will have performed its ``send'' operation and reached line three.
If you continued with this process of single stepping and probing with the ``show state'' command, you would eventually get to a state where the node would show as ``Running'' in the receive function from which it would never return until node 1 got around to sending its message.
Lesson 3. Sets of Nodes The simplest applications of a sequential debugger for parallel programs would be similar to those already seen. Each command issued by the user to the debugger is executed on a particular node. Up to now, for example, we have considered only actions on node 0. Obviously, we can't make much progress in the example code shown in Figure 5.7 until node 1 moves from its initial breakpoint at line one.
We might extend the syntax by adding a ``pick'' command that lets us, for example,
pick node 1 and then execute commands there instead of on node 0. This would clearly allow us to make progress in the example we have been studying. On the other hand, it is very tedious to debug this way. Even on as few as four nodes, the sequence
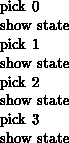
is used frequently and is very painful to type. Running on 512 nodes in this manner is out of the question. The solution adopted for ndb is to use ``node sets.'' In this case, the above effect would be achieved with the command
on all show state or alternatively

The basic idea is that debugger commands can be applied to more than a single processor at once. In this way, you can obtain global information about your program without spending hours typing commands.
In addition to the simple concepts of a single node and ``all'' nodes, ndb supports other groups such as contiguous ranges of nodes, discontinuous ranges of nodes, ``even'' and ``odd'' parity groups, the ``neighbors'' of a particular node, and user-defined sets of nodes to facilitate the debugging process. For example, the command
on 0, 1, nof 1, even show state executes the ``show state'' command on nodes 0, 1, the neighbors of node 1, and all ``even parity'' nodes.
Lesson 4. Smart stepping Once node sets are available to execute commands on multiple processors, another tricky issue comes up concerning single stepping. Going back to the example shown in Figure 5.7, consider the effect of executing the sequence of commands

starting from the initial state in which both nodes are at a breakpoint at line one. The intent is fairly obvious-the user wants to single-step over the intermediate lines of code from line one, eventually ending up at line five.
In principle, the objections that gave rise to the independence of debugger and user program should no longer hold, because when we step from line two, both nodes are participating and thus the send/receive combination should be satisfied properly.
The problem, however, is merely passed down to the internal logic of the debugger. While it is true that the user has asked both nodes to step over their respective communication calls, the debugger is hardly likely to be able to deduce that. If the debugger expands (internally) the single-step command to something like

then all might be well, since node 0 will step over its ``send'' before node 1 steps over its receive-a happy result. If, however, the debugger chooses to expand this sequence as

it will hang just as badly as the original user interaction.
Even though the ``obvious'' expansion is the one that works in this case, this is not generally true-in fact, it fails when stepping from line four to line five in the example.
In general, there is no way for the debugger to know how to expand such command sequences reliably, and as a result a much ``smarter'' method of single stepping must be used, such as that shown schematically in Figure 5.8.
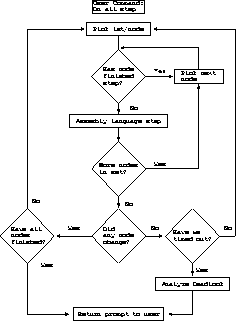
Figure 5.8: Logic for Single Stepping on Multiple Nodes
The basic idea is to loop over each of the nodes in the set being stepped trying to make ``some'' progress towards reaching the next stopping point. If no nodes can make progress, we check to see if some time-out has expired and if not, continue. This allows us to step over system calls that may take a significant time to complete when measured in machine instructions.
Finally, if no more progress can be made, we attempt to analyze the reason for the deadlock and return to the user anyway.
This process is not foolproof in the sense that we will sometimes ``give up'' on single steps that are actually going to complete, albeit slowly. But it has the great virtue that even when the user program ``deadlocks'', the debugger comes back to the user, often with a correct analysis of the reason for the deadlock.
Lesson 5. Show queue Another interesting question about the debugger concerns the extensions and/or modifications that one might make to a sequential debugger.
One might be tempted to say that the parallel debugger is so different from its sequential counterparts that a totally new syntax and method of operation is justified. One then takes the chance that no one will invest the time needed to learn the new tool and it will never be useful.
For ndb, we decided to adopt the syntax of the well-known UNIX dbx debugger that was available on the workstations that we used for development. This meant that the basic command syntax was familiar to everyone using the system.
Of course we have already introduced several commands that don't exist in dbx, simply because sequential debuggers don't have need for them. The ``show state'' command is never required in sequential debuggers because the program is either running or it's stopped at a point that the debugger can tell you about. Similarly, one never has to give commands to multiple processors.
Another command that we learned early on was very important was ``show q'', which monitored the messages in transit between processors. Because our parallel programs were really just sequential programs with additional message passing, the ``bugs'' that we were trying to find were not normally algorithmic errors but message-passing ones.
A typical scenario would be that the nodes would compute (correctly) and then reach some synchronization or communication point at which point the logic relating to message transfer would be wrong and everything would hang. At this point, it proved to be immensely useful to be able to go in with the debugger and look at which nodes had actually sent messages to other nodes.
Often one would see something like
Node 1, type 12, len 32
(12 4a 44 82 3e 00 ...)
Node 2, type 12, len 32
(33 4a 5f ff 00 00 ...)
Node 1: No messages
Node 2: No messages
Node 0:
indicating that node 0 has received two messages of type 12 and
length 32 bytes from node 1 and node 2 but that neither node 1 nor node 2 has
any.
Armed with this type of information, it is usually extremely easy to detect the commonest type of parallel processing problem.
Lesson 5a. Message Passing Is Easy An interesting corollary to the debugging style just described is that we learned that debugging message-passing programs was much easier than other types of parallel programming.
The important advantage that a user-friendly debugger brings to the user is the ability to slow down the execution of the program to the point where the user can ``see'' the things that go wrong. This fits well with the ``message-passing'' methodology since bugs in message passing usually result in the machine hanging. In this state, you have plenty of time to examine what's happening and deduce the error. Furthermore, the problem is normally completely repeatable since it usually relates to a logic error in the code.
In contrast, shared-memory or multiprocessing paradigms are much harder because the bugs tend to depend on the relative timing of various events within the code. As a result, the very act of using the debugger can cause the problem to show up in a different place or even to go away all together. This is akin to that most frustrating of problems when you are tracking down a bug with print statements, only to find that just as you insert the climactic final statement which will isolate your problem, it goes away altogether!
Lesson 6. How Many Windows? The debugger ndb was originally designed to be driven from a terminal by users typing commands, but with the advent of graphical workstations with windowing systems it was inevitable that someone would want a ``windowing'' version of the debugger.
It is interesting to note that many users' original conception was that it would now be correct to port a sequential debugger and have multiple instances of it, each debugging one node.
This illusion is quickly removed, however, when we are debugging a program on many nodes with many invocations of a sequential debugger. Not only is it time-consuming setting up all of the windows, but activities such as single stepping become extremely frustrating since one has to go to each window in turn and type the ``continue'' command. Even providing a ``button'' that can be clicked to achieve this doesn't help much because you still have to be able to see the button in the overlapping windows, and however fast you are with the mouse it gets harder and harder to achieve this effect as the number of nodes on which your program is running grows.
Our attempt at solving this problem is to have two different window types: an ndb console and a node window. The console is basically a window-oriented version of the standard debugger. The lower panel allows the user to type any of the normal debugger commands and have them behave in the expected fashion. The buttons at the top of the display allow ``shortcuts'' for the often issued commands, and the center panel allows a shortcut for the most popular command of all:
on all show state This button doesn't actually generate the output from this command in the normal mode since, brief as its output is, it can still be tedious watching 512 copies of
Node XXX: Breakpoint, [foo.c, 13] scroll past. Instead, it presents the node state as a colored bar chart in which the various node states each have different colors. In this way, for example, you can ``poll'' until all the nodes hit a breakpoint by continually hitting the ``Update'' button until the status panel shows a uniform color and the message shows that all nodes have reached a breakpoint.
In addition to this usage, the color coding also vividly shows problems such as a node dividing by zero. In this case, the bar chart would show uniform colors except for the node that has died, which might show up in some contrasting shade.
The second important use of the ``Update'' button is to synchronize the views presented by the second type of window, the ``node windows.''
Each of these presents a view of a ``group'' of nodes represented by a particular choice. Thus, for example, you might choose to make a node window for the nodes 0-3, represented by node 0. In this case, the upper panel of the node window would show the source code being executed by node 0 while the lower panel would automatically direct commands to all four nodes in the group. The small status bar in the center shows a ``smiley'' face if all nodes in the group appear to be at the same source line number and a ``sad'' face if one or more nodes are at different places.
This method allows the user to control large groups of nodes and simultaneously see their source code while also monitoring differences in behavior. A common use of the system, for example, is to start with a single node window reflecting ``all nodes'' and to continue in this way until the happy face becomes sad, at which point additional node windows can be created to monitor those nodes which have departed from the main thread of execution.
The importance of the ``Update'' button in this regard is that the node windows have a tendency to get out of sync with the actual execution of the program. In particular, it would be prohibitively expensive to have each node window constantly tracking the program location of the nodes it was showing, since this would bombard the node program with status requests and also cause constant scrolling of the displayed windows. Instead, ndb chooses its own suitable points to update the displayed windows and can be forced to update them at other times with the ``Update'' button.